
This upside-down apricot cake recipe is probably the best and easiest apricot cake recipe you can make. It's definitely my favorite!

No kidding. I love this apricot cake so much that I could easily eat it every week for a while. It is so quick and easy to make that if it weren't for all the other cakes I would like to try, I could really make this every week.
Preparing everything takes about 15 minutes, and the steps are so easy that even my 5-year-old daughter could almost make it by herself. This apricot cake is great if you enjoy baking with your kids.
Check out more easy cakes, such as Brown Sugar Cinnamon Cake, Moist Orange Bundt Cake, Blitzkuchen, or Apple Olive Oil Cake.
Jump to recipe
Recipe ingredients
Fresh apricots: I chose to make it with apricots because they are plentiful at the moment, and we all love them so much, but you could make this cake any time of the year and with whatever fruit you have. You could try it with sweet or sour cherries, nectarines or peaches, apples, plums, etc.
- If you have a glut of apricots, learn How to Preserve Apricots or make this delicious Apricot Sauce.
Butter to thickly grease the baking dish. You will not need extra butter for the batter (people have asked).
Granulated sugar is thickly sprinkled on the buttered baking dish, and some is used for the batter.
Other ingredients: All-purpose flour, baking powder, eggs, and lemon juice.
This apricot cake is another vintage recipe I found in Silvia Jurcovan's Cookbook. I told you a bit more about her in this post about the Greta Garbo Cake a few weeks ago. Like that one, this cake was spot-on - just perfect!
How to make apricot cake?
Butter and sugar layer
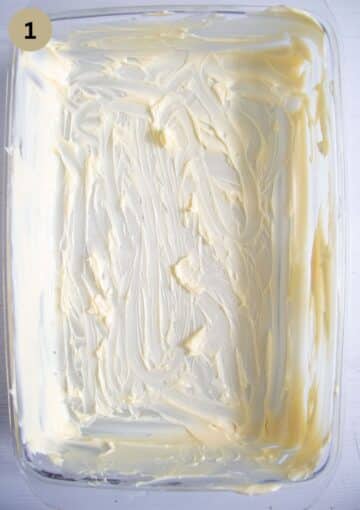
Step #1: Thickly butter the baking dish; use all the butter indicated in the recipe card.
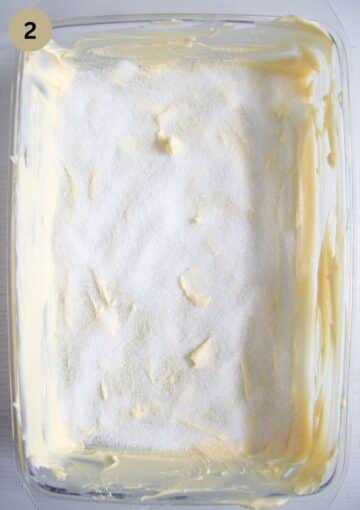
Step #2: Cover the buttered baking dish with a thick layer of sugar.
The butter isn't mixed into the cake batter; you use it to coat the baking dish generously. The halved apricots are placed on top of the sugar, and they partially cook in the butter-sugar mixture before the batter is added on top.
Apricot layer

Step #3: Add the halve fruit to the baking dish.
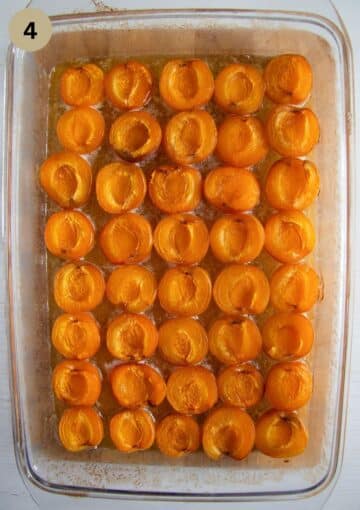
Step #4: Bake for 20-25 minutes until the fruit starts to get soft and wrinkly.
By this time, the sugar and butter will have melted together, forming a sweet and buttery sauce for the apricots. The fruit needs to cool for about 3 minutes before covering it with the batter.
Batter layer
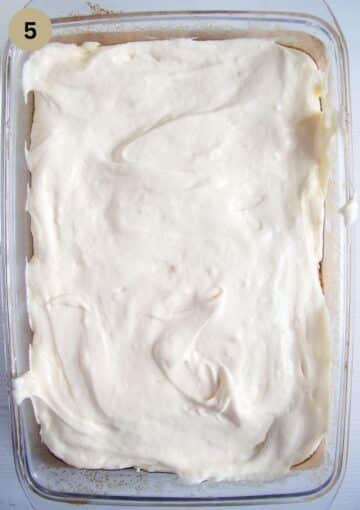
Step #5: Make the cake batter and spread it over the baked apricots.
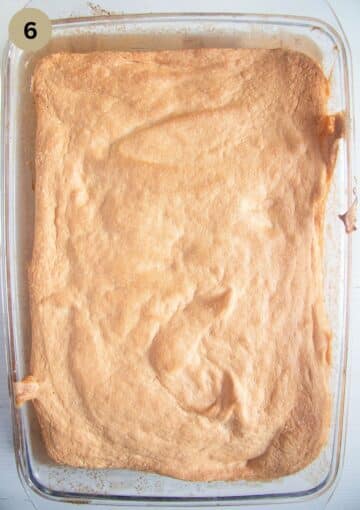
Step #6: Continue baking the apricot cake for 30 minutes. Make the toothpick test.
Be careful when folding the egg yolks and flour mixture into the egg whites. Use a hand whisk, not an electric mixer, and fold gently with as few movements as possible. This will help the cake rise nicely.
Opening the oven too early might cause the apricot cake to sink. After 20 minutes, you can check the cake if necessary. If you feel it's getting too dark, reduce the oven temperature to 320°F/ 160°C.
Bake

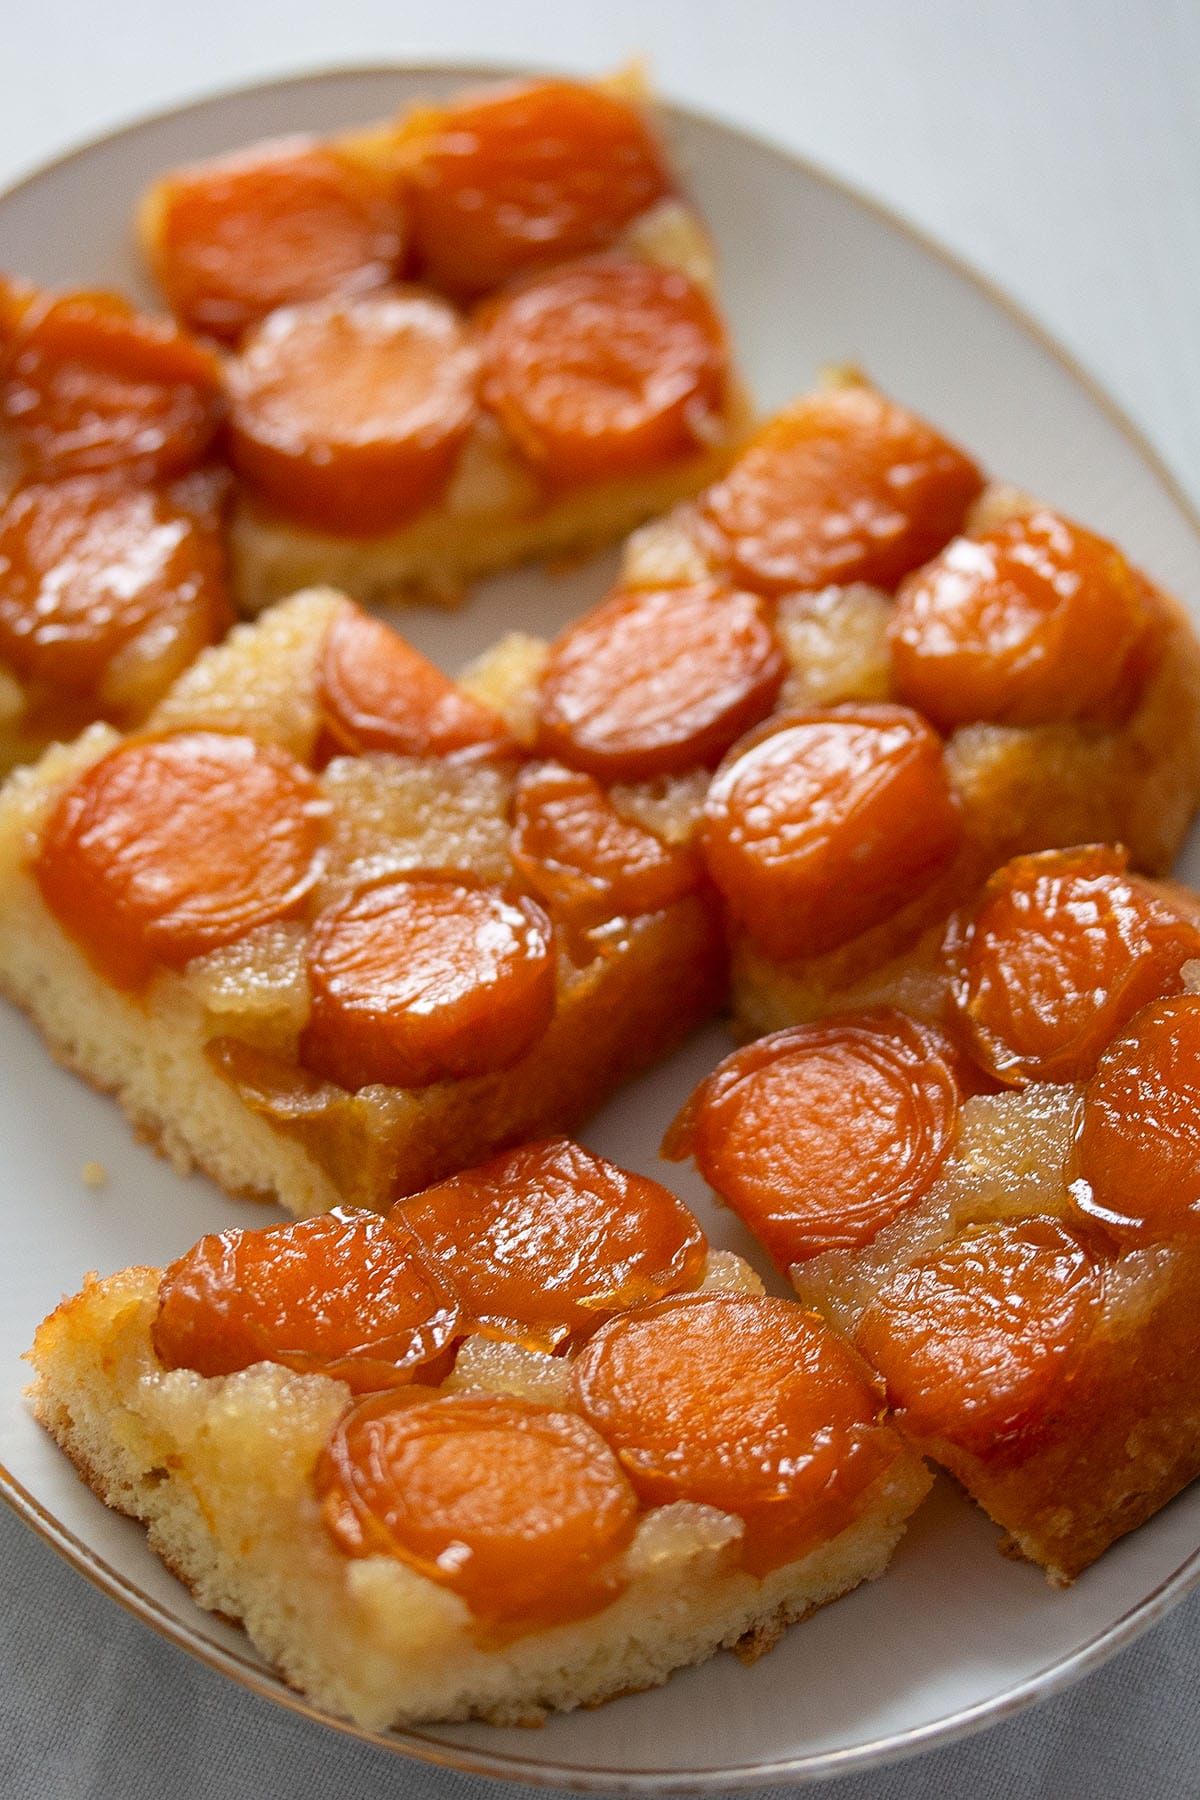
Step #7: Let the cake rest for 5-10 minutes, then carefully invert it on a large platter.

Step #8: Let the cake cool, then cut into squares.
At first glance, you might think the cake is undercooked because the butter-sugar layer will look rather wet. But it is not undercooked or wet; it is just glossy because of the butter and the sugar.
How to invert the upside-down cake?
After removing the apricot cake from the oven, let it cool for 5 to 10 minutes. Run a butter knife around the edges to loosen it.
Choose a rectangular serving platter slightly larger than your baking dish. Place the platter on top of the dish, using mittens to protect your hands, and carefully flip the cake onto the platter. The cake should fall onto the platter easily.
You'll see three layers: The fluffy cake, the apricots, and the butter-sugar layer. The butter-sugar layer may look wet, but it's just glossy from the butter and sugar; it's not undercooked. See the picture above for reference.


Apricot Cake
Equipment
- Rectangular baking dish of about 21x32 cm/ 8x13 inches
Ingredients
Butter-sugar-apricot-layer
- 100 g unsalted butter ⅓ cup + 1 tablespoon, Notes 1, 2
- 100 g granulated sugar 3.5 oz/ ½ cup
- 750 g small apricots 1.7 lbs, a bit more or less as needed
Batter layer:
- 4 eggs large
- 80 g granulated sugar ⅓ cup + 1 tablespoon
- 1 tablespoon lemon juice
- 80 g all-purpose flour 3 oz/ ⅔ cup
- 1 teaspoon baking powder
- whipped cream for serving, optional
Instructions
Butter, Sugar and Apricot Layer
- Preheat the oven to 180°C/ 350°F.
- Butter baking dish: Butter its bottom and walls with all the butter. You will have a thick layer of butter all over.100 g unsalted butter/ ⅓ cup + 1 tablespoon
- Sprinkle the sugar only on the bottom of the baking dish.100 g granulated sugar/ ½ cup
- Apricots: Halve them and remove the stone. If the apricots are very large, you could quarter them. Then, place the apricots on the sugared pan carefully, cut side up, taking care not to disturb the sugar too much; the sugar should not come on top of the fruit. 750 g small apricots/ 1.7 lbs
- Bake for 20 to 25 minutes or until the fruit starts to get soft and wrinkly.
Batter Layer:
- Beat egg whites: Separate 4 eggs shortly before the baking time for the apricots is up. Beat the egg whites until stiff. Add sugar and lemon juice and continue beating until stiff and glossy. Set aside.egg whites + 80 g granulated sugar/ ⅓ cup + 1 tablespoon + 1 tablespoon lemon juice
- Remove the baking dish from the oven. Leave to stand for 3 minutes.
- Make the batter: In the meantime, carefully fold the egg yolks into the egg white mixture. Use a hand whisk to do this, and don't overdo it. Next, add the mixed flour and baking powder to the egg mixture and fold in very carefully again; you should not overdo it either.egg yolks + 80 g all-purpose flour/ ⅔ cup +1 teaspoon baking powder
- Bake: Spread the mixture over the fruit, level nicely, and bake for about 30 minutes. Don't open the oven during the first 20 minutes of baking (Note 3). Check after 20 minutes and reduce the temperature to about 160°C/ 320°F if you think the cake already has too much color.
- Check doneness with a toothpick; it should come out clean. Remove the apricot cake from the oven. Leave to stand for 5 to 10 minutes.
- Invert the cake: Then, run a knife around the edges of the cake to release it from the walls of the baking dish. Place a rectangular serving dish on the baking dish and reverse the cake onto the serving dish (Note 4).
- Cut the cake into squares and enjoy warm or cooled with some whipped cream on the side, if you wish.
Notes
- Measurements: Always use a digital kitchen scale in baking; it ensures the best results (the Amazon affiliate link opens in a new tab).
- The butter isn't mixed into the cake batter; you use it to coat the baking dish generously. You will not need any butter for the cake batter.
- Opening the oven too early might cause the apricot cake to sink. After 20 minutes, you can check the cake if necessary. If you feel it's getting too dark, reduce the oven temperature to 320°F/ 160°C.
- Tip: At first glance, you might think that the cake is undercooked because the butter-sugar layer will look rather wet. But it is not undercooked or wet; it is just glossy because of the butter and the sugar.


Ellen Claire Boughn says
The apricots in the market are not ripe nor do they ripe either inside or outside the frig. They aren't rock hard but don't give when poked. Will they be ok once cooked?
Thank you!
Adina says
Hi Ellen. The apricots should not be like rocks, but if they're just underripe, it's ok. They will soften.
Barbara says
Why not beat the flour and baking soda into the egg yolks and then fold in the egg whites?
Adina says
I suppose the batter is even airier when flour is only folded in gently at the end.
Barbara says
I am very lucky then because I estimate that I would have picked between 25-30 kgs off our tree in the last fortnight. A bumper crop! It has obviously been a good year for them in Melbourne, Australia.
Barbara says
I have had a glut of fabulous apricots in the last 10 days. I have made jam, chutney, stewed some and frozen them, given some away and eaten lots. But still they come! I came across this recipe and made it two days ago for a crowd. It was a HUGE success so much so that I made it again the next day. It is light, tangy and absolutely delicious and the recipe is very clear with foolproof instructions. A keeper for sure! Thank you Adina.
Adina says
Hi Barbara, thank you for your feedback, I am so glad you liked the cake as much as we do. And you are so lucky with all the apricots, they are in season here in June, July, but I can never get as many as I would wish for as they do not grow in Germany (too cold for them, I suppose) and that makes them expensive. I can only buy them in the supermarket, but they are rarely as sweet and aromatic as I remember them from my childhood in Romania.
Rebecca says
Note for future bakers: I made the mistake of using a loose bottomed tin....all my caramel escaped!
Still looks delicious...have to wait for the birthday boy to confirm the taste.
Thanks for the recipe!
Adina says
Oh sorry, Rebecca, a casserole dish is better in this case. I hope your birthday boy likes it, it is my daughter's favorite cake, we've just made it together again on Sunday, with plums this time. 🙂
Adina says
Thank you, Julie. 🙂
Julie says
I have just put this in the oven, when I realised the second lot of butter didn't go in. After re-reading the recipe, I can't find where it goes in! I can't see the need for more butter though. Hopefully it turns out ok!
Adina says
Hi Julie. The instructions about the butter are at the very beginning. You were supposed to smear the baking dish very thickly with all the butter.
Julie says
Thanks Adina; yes it turned out ok in the end. I think I could use even less butter next time. The batter seemed to be swimming in it!