
Heart-shaped, blue, and pink Valentine's butter cookies with a pretty flood icing, the perfect sweet gift for your Valentine.

Bake up the perfect love story with heart-shaped Valentine butter cookies. Our easy recipe will add a sweet touch to your celebration. Fall in love with baking today!
I like baking cookies, biscuits, or Plätzchen, the way we call them in Germany. You will find many recipes on the blog, like the ginger snaps with candied ginger, Vanillekipferl, or German hazelnut macaroons, to name just a few of my favorite ones. Or try these pretty Easter Mini Egg Cookies.
You might have noticed, though, that I bake most of these cookies in December; I rarely ever bake cookies at any other time of the year.
However, I got into baking for Valentine now as well. Not much, just some Cranberry Oatmeal Walnut Cookies (red dots of cranberries) and these heart-shaped blue and pink Valentine butter cookies; they are so cute, so kitschy, perfect for Valentine's Day :).
Jump to recipe
Expert tips!
- Always use a kitchen scale in baking; cup measuring can lead to disasters.
- I have several sizes of heart cutters; I used the largest one.
- Keep an eye on the cookies while they are in the oven as well; you should not overbake them. If your heart-shaped cutter is smaller, the cookies will need a shorter baking time; make sure to check; the Valentine butter cookies should be only lightly golden.

How to make heart-shaped butter cookies?
To make these Valentine's butter cookies couldn't be any easier. Making cookie dough is generally a very quick and easy matter, and this particular recipe is really fool-proof. You only need a heart cookie cutter (the Amazon affiliate link opens in a new tab), but that should not be very hard to find.
Recipe steps:
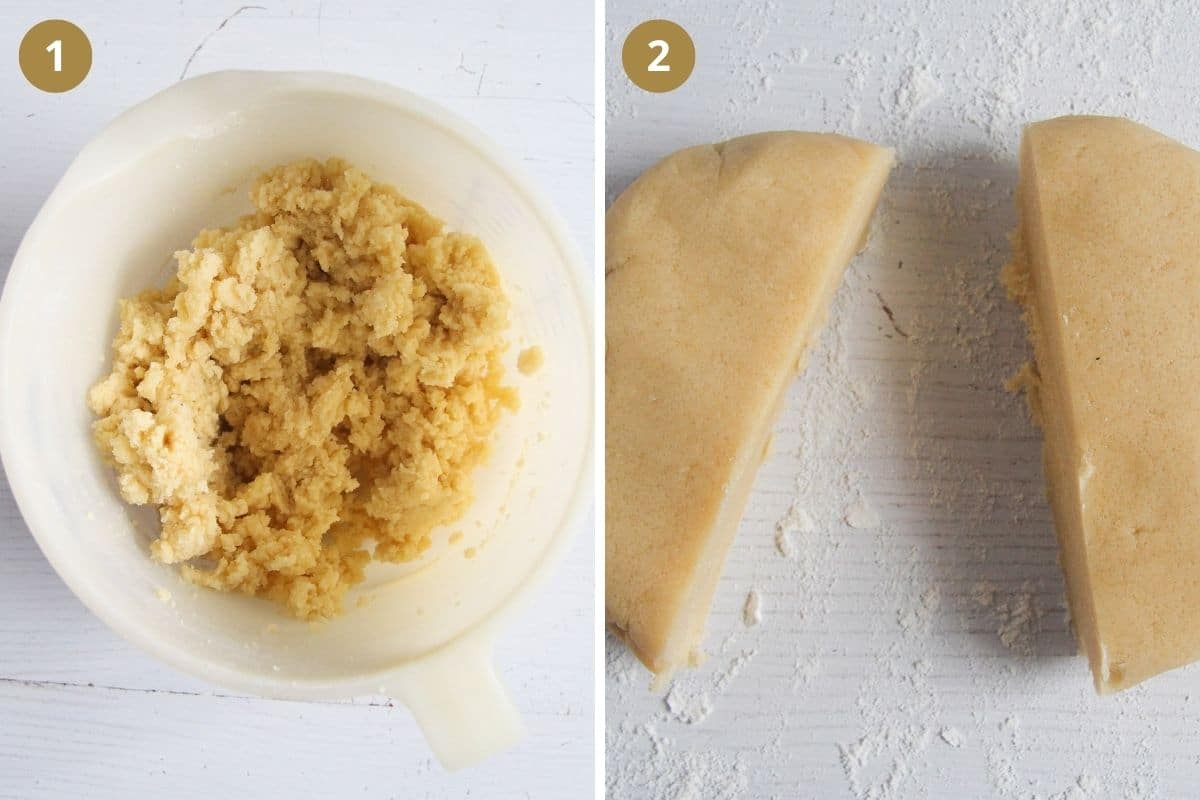
- Dough: Mix the sugar, vanilla sugar or extract, cornstarch, and flour. Add the cold chopped butter and the egg (1). Knead the dough with the handheld mixer. Transfer to the working surface and knead shortly with your hands until the dough is nice and smooth (2).
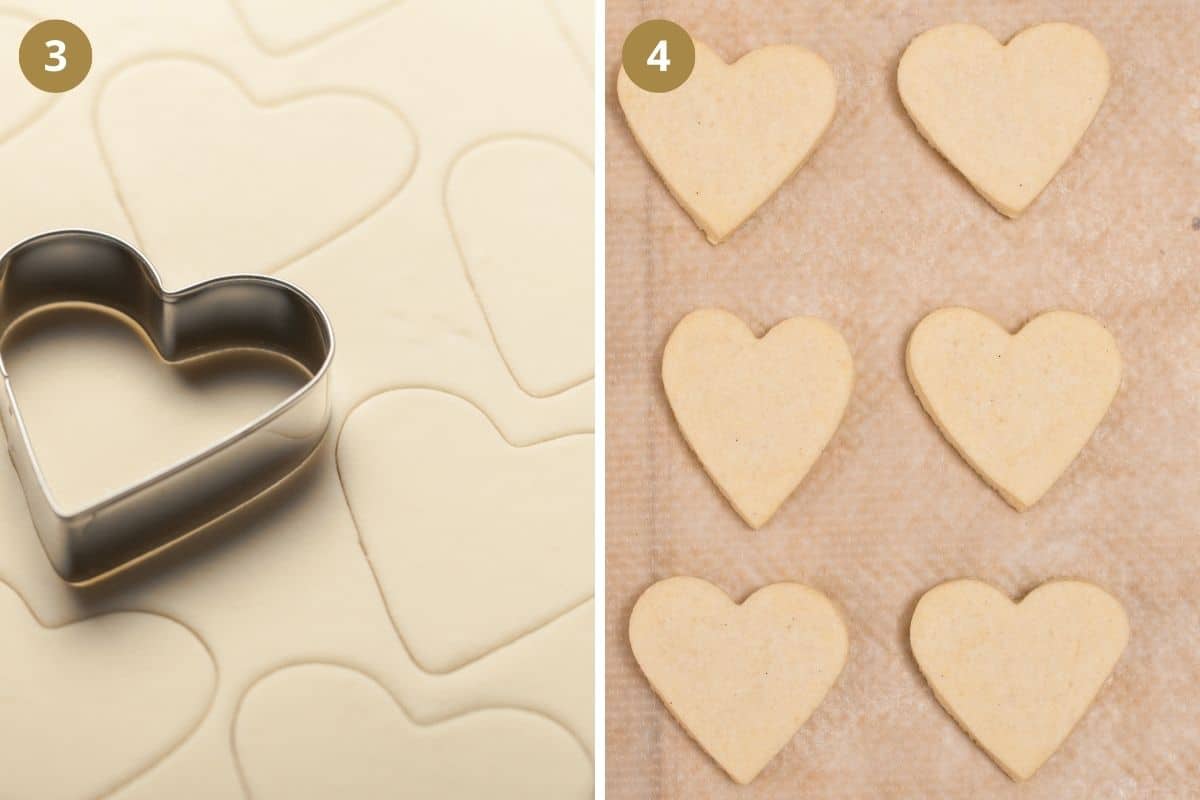
- Cut on a lightly floured surface with a heart cutter (3). Knead the dough scraps again, roll them, and cut out more cookies. Continue in this manner until all the dough is used; you will have about 45 pieces.
- Bake on baking trays lined with baking paper for about 12 minutes per batch or until lightly golden (4).
- Repeat: Cut the following cookie batch while the first batch is in the oven.
- Cool for about 5 minutes on the tray so that they can set. If you try to remove them immediately, they might break. Transfer the cookies to wire racks to cool completely. Only add the icing when the Valentine's butter cookies are completely cold.
How to make flood icing?
The source for the flood icing is BBC Good Food; this is the recipe of one of the contenders from The Great British Bake Off. I don't know if he won the show, but he definitely won me with this perfect flood icing.
Flood icing:
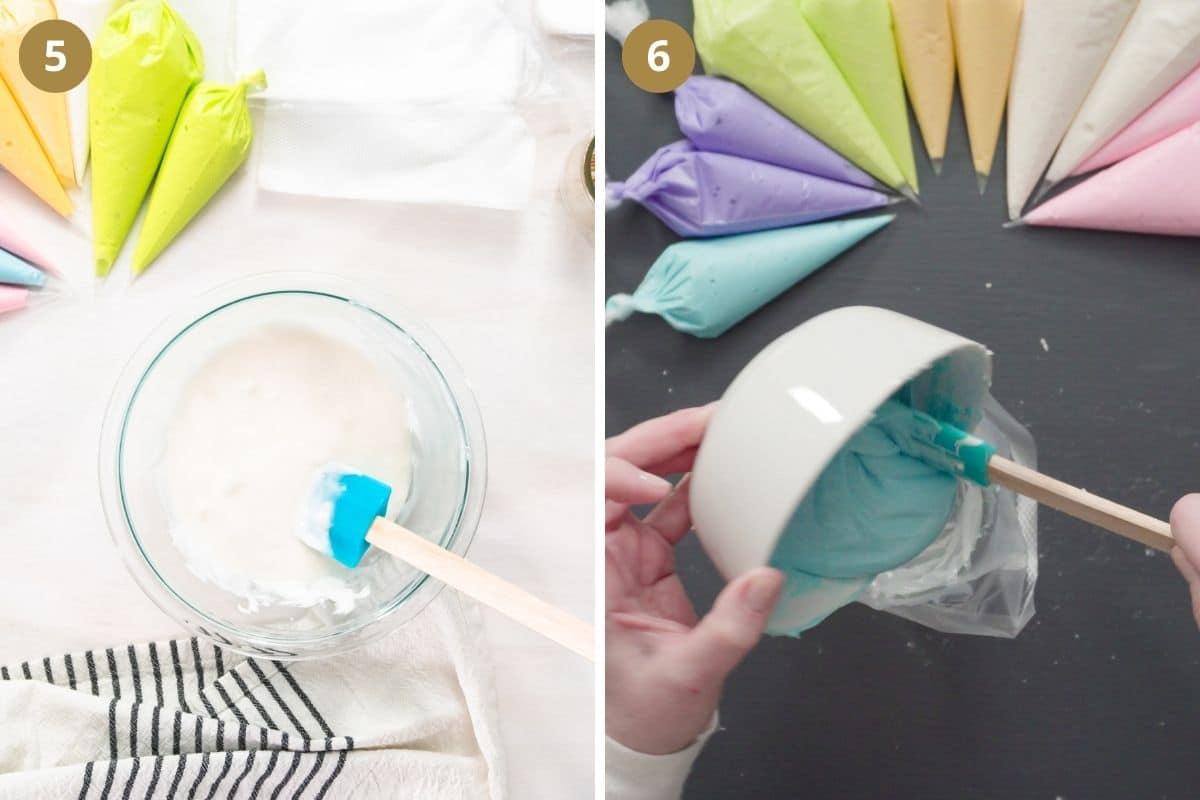
- Mix the icing sugar with lemon juice until smooth, thick and glossy. Place about a quarter of this mixture into a piping bag fitted with a very small round tip. Set the piping bag aside (5).
- Add another tablespoon of lemon juice to the remaining icing in the bowl. Add only a few drops of lemon juice more if necessary; the mixture should be pourable but not thin. Mix well and divide the icing between two small bowls.
- Color the sugar icing in one bowl in pink and the icing in the second bowl in turquoise. Place each mixture into a piping bag (6).
How to decorate with flood icing?
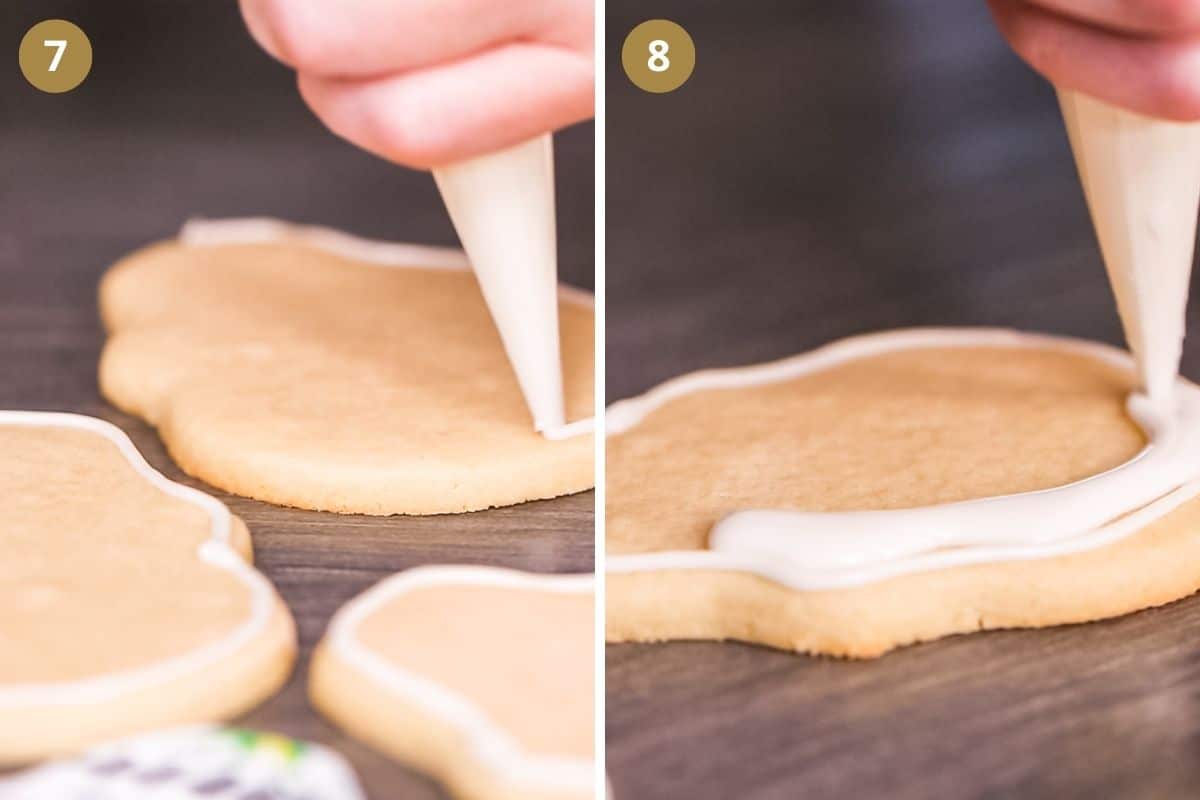
- Outline each Valentine cookie with the stiffer white icing from the first piping bag. Let this icing set for about 5 minutes.
- Pipe a little of the colored icing onto the cookie to cover the surface. Use a toothpick to spread the icing evenly inside the white frame. You will find that annoying while you make the first one or two cookies, but it will get easier and much quicker by the time you get to the third cookie, so don't panic.
- Place the cookies on the working surface in the order you flood them. After flooding about 4 to 5 cookies or so, you can start making the dots on the first cookie you've flooded. The flooding should be just a little bit set at this point but still wet enough to allow the dots to sink nicely into it.
- Pipe the dots with the white icing. Use a clean toothpick to smooth the dots, if necessary. Some of my dots had a bit of a comet tail pointing upwards, but I could fix that with the toothpick easily.
How to dry flood icing?
- Once you have flooded all the Valentine butter cookies, arrange them on baking trays lined with baking paper and place them in the oven.
- Set the oven at its lowest setting and leave the cookies in the oven for about 20-30 minutes to allow the icing to set hard.
- Keep an eye on them, not that your oven is too hot!
Recipe FAQ
Whatever you like. You can make and decorate these cookies as Christmas cookies or whatever. If using smaller cutters, keep an eye on the cookies in the oven and reduce the baking time. They should be only slightly golden.
No, leave them as they are or ice them with a simple white icing without special decoration tricks. You could sprinkle the icing with sugar pearls or similar.
Undecorated cookies last for at least 2-3 weeks in an airtight container.
Flooded ones should be consumed within one week. They will not exactly spoil, but the decoration might start to bleed.

More Valentine's Day recipes


Valentine Butter Cookies
Equipment
- Baking sheets
- Hand-held mixer
- Rolling Pin
- Piping bag
Ingredients
Sugar cookies (Notes 1,2):
- 150 g granulated sugar 5.5 oz/ ¾ cup
- ½ tablespoon vanilla sugar or ¼ teaspoon vanilla extract
- 90 g cornstarch 3 oz/ ¾ cup
- 330 g all-purpose flour 12 oz/ 3 ¾ cups
- 200 g unsalted butter 7 oz/ ¾ cup + 1 tablespoon
- 1 egg medium Germany, large US
Flood icing:
- 500 g icing sugar 17.5 oz/ 5 cups
- 7 + 1 to 1 ½ tablespoons lemon juice divided
- a few drops pink food coloring
- a few drops turquoise food coloring
- a few toothpicks
Instructions
Sugar cookies:
- Preheat the oven to 200°C/ 400°F (fan oven 180°C/ 360°F). Line two baking trays with parchment paper.
- Dough: Mix the sugar, vanilla sugar or extract, cornstarch, and flour. Chop the butter into small pieces and add them to the mixture. Add the egg. Knead the dough with the hand-held mixer. Turn the dough onto the working surface and knead shortly to form a disc of dough.150 g granulated sugar/ ¾ cups/ 5.5 oz + ½ tablespoon vanilla sugar+ 90 g cornstarch/ ¾ cup/ 3 oz + 330 g all-purpose flour/ 3 ¾ cups/ 12 oz + 200 g unsalted butter/ 7 oz + 1 egg
- Roll the dough on the lightly floured working surface and cut out the cookies with a heart cutter. I used the largest heart cutter. Next, knead the dough scraps again, roll them and cut out more cookies. Continue in this manner until all the dough is used. I had about 45 large heart-shaped cookies, but you could have more if you use a smaller cutter.
- Bake: Place the cookies on the prepared baking tray and bake for about 12 minutes or until lightly golden. Keep an eye on them, the baking time depends on the size of the cookies as well, smaller hearts will need a shorter baking time.
- Let cool for about 5 minutes on the trays, then transfer the cookies to wire racks to cool completely. Only add the icing when completely cold.
Flood icing:
- Icing: Mix the icing sugar with 7 tablespoons of lemon juice until smooth, thick and glossy. Place about a quarter of this mixture into a piping bag fitted with a very small round tip. Set the piping bag aside. 500 g icing sugar/ 5 cups/ 17.5 oz + 7 + 1 to 1 ½ tablespoons lemon juice + a few drops food coloring
- Add 1 tablespoon lemon juice to the remaining icing in the bowl. Add only a few drops of lemon juice more if necessary; the mixture should be pourable but not thin. Mix well and divide the icing between two small bowls.
- Color the sugar icing in one bowl in pink and the other one in turquoise. Place each mixture into piping bags.
Decorate:
- Outline each cookie with some of the stiffer white icing. Let this icing set for about 5 minutes.
- Pipe some of the colored icing onto the cookie, enough to cover the surface. Use a toothpick to properly spread the icing evenly inside the white icing frame.
- Make dots: Place the cookies on the working surface in the order you flooded them. After flooding about 4 cookies or so, you can start making the dots on the first cookie you've flooded. The flooding should be just a little bit set at this point, but still wet enough to allow the dots to sink nicely into it.Pipe the dots with the white icing. Use a clean toothpick to smooth the dots, if necessary.
- Let icing set: Place the cookies on baking trays lined with baking paper and place them in the oven. Set the oven at its lowest setting and leave the cookies in the oven for about 20-30 minutes to allow the icing to set hard.
Notes
- Use a digital kitchen scale (the Amazon link opens in a new tab) to measure the ingredients when baking; it guarantees the best results.
- This is my usual, fool-proof sugar cookie recipe. A whole batch makes lots of cookies, between 40 and 60, depending on the size of the cutters. If you want to make only half of the batch, halve the quantities, including the egg. To split an egg properly, beat it well in a small cup, measure it, and only add half of the liquid egg to the dough.


Anca says
I plan to make some biscuits for Valentine's Day, or I should say before that, so I can share the recipe. Yours look great.