
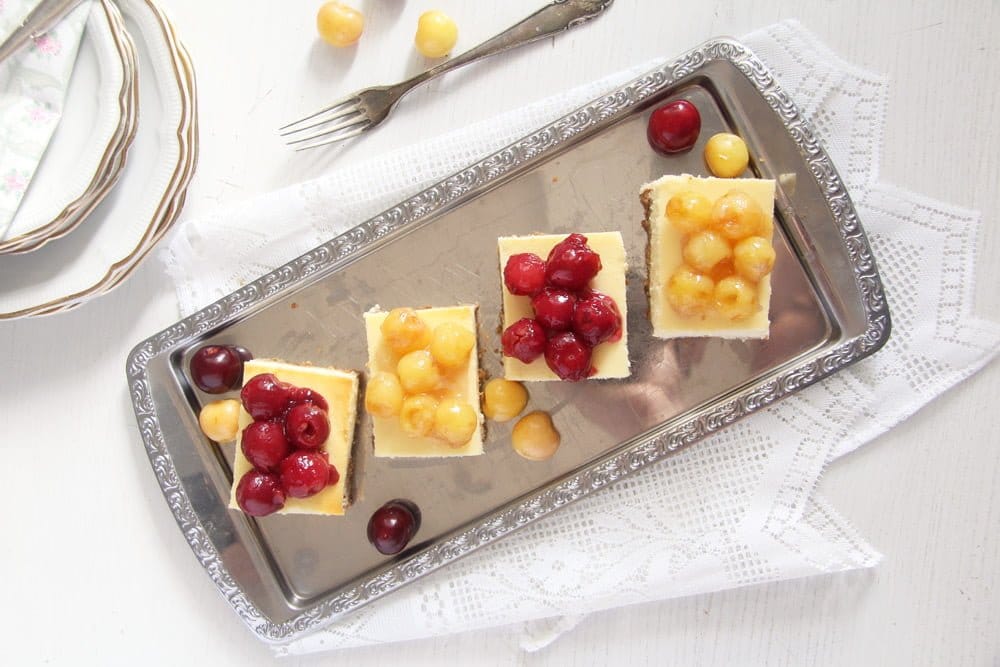
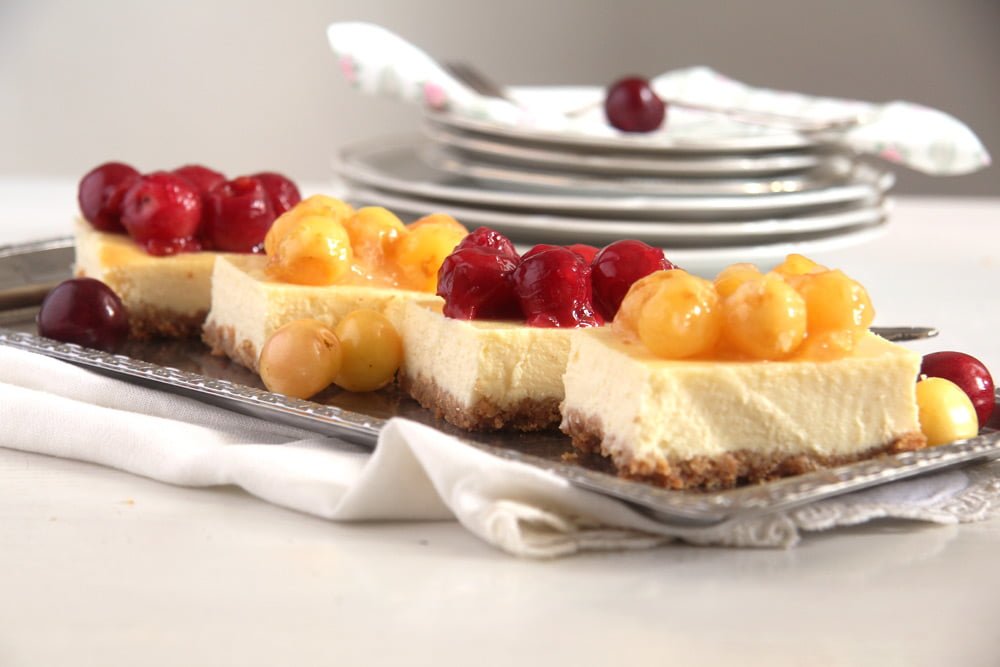
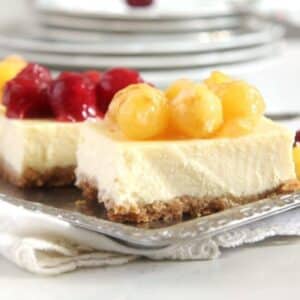
These Philadelphia cream cheese bars with cherry topping are rich, fresh cherry cheesecake squares, incredibly creamy, and delicious!
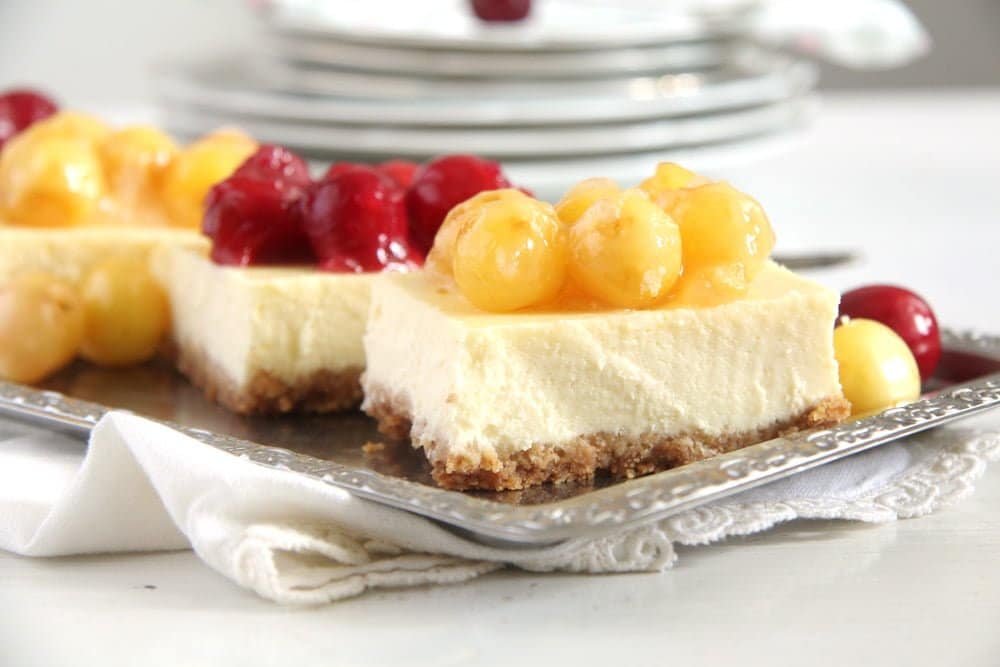
Mouth-watering cream cheese bars topped with a luxurious homemade fresh cherry pie filling.
Cheesecakes are just amazing, aren't they? I know I love any kind of cheesecake. I bake lots and lots of them, and I've tried so many different recipes over the years that I cannot even remember them all.
You could have a look at some of my favorites. For instance, this crustless cheesecake, the German cheesecake, the no-bake no-bake lemon curd cheesecake with blueberries, or the baked blueberry cheesecake. And so many others...
Jump to recipe
What do you need?
Crust:
- You will need plain sweet biscuits and butter.
- Germany or anywhere in Europe: butter biscuits, also known as Butterkekse or Petit Beurre.
- UK: you can choose digestives.
- US: Graham crackers will probably be your first choice.
Dairy:
- Philadelphia or Philadelphia-style cream cheese, definitely full-fat.
- Sour cream.
Other ingredients: some flour, vanilla extract, sugar, and eggs.
Cherry topping
- You will need fresh cherries to make the topping from scratch, about 1 kg/ 2.2 lbs weighed before pitting the cherries.
- There will probably be more topping than you need to top the cream cheese bars.
- You can serve the rest on the side and keep it in the fridge, and enjoy it during the next days in your homemade muesli or buckwheat porridge, with rice pudding, ice cream, German waffles, pancakes, or creme fraiche crepes.
Alternative to fresh cherries:
- Make this cherry sauce recipe using frozen or canned cherries.
- Or use bought cherry pie filling to top the cream cheese bars.
- Both alternatives are great if you would like to make the cherry-topped cheesecake when fresh cherries are not in season.
Tips for making cream cheese bars
- Always use a kitchen scale for the best results (Amazon affiliate link).
- Bake the cheesecake one day in advance; any cheesecake tastes better the next day, so it is worth it to let it rest overnight.
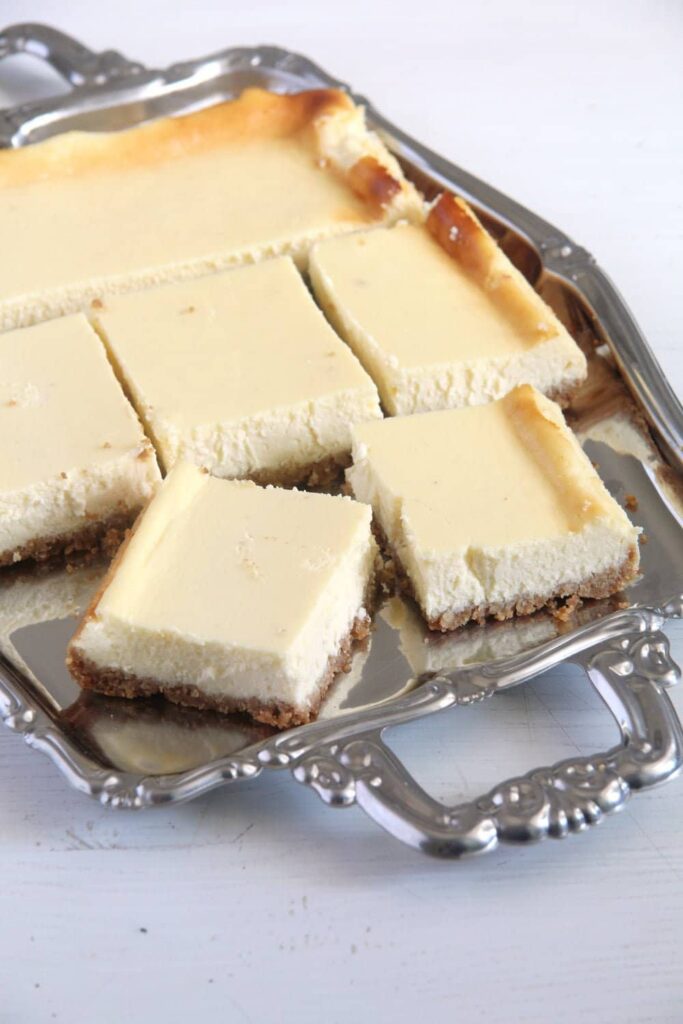
- Line a baking dish of about 33x23 cm/13x9 inch with parchment paper. Leave the paper hanging over the edges of the pan so that you can more easily remove the cheesecake from the pan once it is baked.
- Crush the biscuits in the food processor. If you don't have one, place them in a freezer bag, seal it well, and crush them with a rolling pin. Transfer to a bowl, mix with the melted butter, and press into the baking dish.
- While making the cream cheese filling, don't forget to scrape the walls of the mixing bowl a few times in between.
- Also, make sure to beat the mixture very well after each egg addition.
- Bake the cheesecake, let cool completely in the baking dish, cover, and refrigerate overnight.
- Use a cherry stoner to stone the cherries; it is a wonderful tool, and it makes life so much easier.
- Top the cream cheese bars with the fresh cherry pie filling shortly before serving.
How to store?
- The cream cheese bars keep well for about 3-4 days when kept in airtight containers in the refrigerator.
- The cherry topping also keeps well in the fridge, for at least 4-5 days. Keep in an airtight container as well.
- It is preferable to add the topping to the cheesecake bars just before serving, but if you have some leftovers that are already topped with cherries, they will be fine for at least 2-3 days as well.
More cream cheesecakes?
- Chocolate Cake with Cream Cheese Frosting
- Cheesecake with Gooseberry Topping
- Cappuccino Whiskey Cake
- Philadelphia Brownies
Do you like this recipe?
Please leave a good rating in the recipe card below. Stay in touch through social media: Pinterest, Facebook, and Instagram. Don't forget to tag #whereismyspoon when you try a recipe!Recipe
Cream Cheese Bars with Cherry Topping
Ingredients
- Cream cheese bars:
- 200 g plain sweet biscuits 7 oz (Note 2)
- 120 g unsalted butter 4.2 oz/ ½ cup
- 900 g Philadelphia cream cheese 2 lbs/ 4 cups
- 3 tablespoons all-purpose flour
- 1-2 teaspoon vanilla extract to taste
- 200 g granulated sugar 7 oz/ 1 cup
- 230 g sour cream 8 oz/ 1 cup
- 4 eggs
- Cherry topping (Note 3)
- 1 kg fresh cherries 2 lbs
- 150 g granulated sugar 5.3 oz/ ¾ cup
- 60 g corn starch 2.1 oz/ ½ cup
- 60 ml water 2 fl.oz/ ¼ cup
- 2 tablespoons lemon juice
Instructions
Cheesecake bars:
- Preheat the oven to 160 degrees Celsius/ 325 degrees Fahrenheit. Line a baking tin (33x23 cm/13x9 inch) with parchment paper. Leave the paper hang over the edges of the pan, so that you can more easily remove the cheesecake from the pan once it is baked and cooled.
- Crust: Crumb the biscuits in a food processor or place them in a freezer bag, seal the bag and crush the cookies with a rolling pin. Melt the butter in a small pan, add it to the crumbs and combine thoroughly. Press this mixture onto the bottom of the pan.
- Filling: Place the cream cheese in a large bowl and whisk with the hand-mixer for a few minutes until fluffy. Scrape down the cream cheese from the sides of the bowl a couple of times in between. Add the flour, sugar, and vanilla and combine. Beat in the sour cream. Start adding the eggs, one at a time, combining thoroughly after each addition.
- Bake: Pour the mixture over the crust and bake for 40 minutes. Cool completely in the pan, cover, and refrigerate overnight.
Cherry topping:
- Topping: Pit the cherries. Place them in a saucepan and add the rest of the ingredients. Stir over medium heat until the sugar and the cornstarch are dissolved. Bring to a simmer and cook until the mixture thickens, stirring very often.
- Top: Let cool and add on top of the cheesecake shortly before serving.
Notes
- Always use a digital kitchen scale in baking; it ensures the best results (Amazon affiliate link).
- You can use any plain sweet biscuits. Germany/Europe: butter biscuits/Butterkekse/Petit Beurre. UK: digestives. US: graham crackers.
- Bought cherry pie filling can be used instead.
You can also make cherry sauce with frozen or canned cherries, just follow this recipe for cherry sauce and double the ingredients for a more generous portion of sauce.


Brie says
Mmmm...cheesecake with fresh cherries sounds so delightful and your gorgeous photos are making my mouth water 🙂 Such a genius idea to use oatmeal cookies in the crust!
Lauren @ Sew You Think You Can Cook says
Oh wow, to have a cherry tree! That's awesome. I like that you made your own pie filling anyway, looks much prettier than the canned version. Beautiful cheesecake. My husband doesn't care for the dessert, but I love it!
grace says
love that oatmeal cookie crust! cherry season is my favorite time of year and this is a great way to highlight them!
Angie@Angie's Recipes says
These cheesecake slices with the cherry topping look absolutely irresistible!
Nammi says
Why are the cherriea yellow? Looks delicious
Susan @ My Wholefood Family says
I love cheesecake and the homemade cherry filling looks amazing! Great pick for SRC!
Tara says
Such beautiful cheesecake slices! I love the alternating color of toppings. Looks incredible.
Anne says
I love the idea of cherry filling, this looks delicious!
Cheyanne @ No Spoon Necessary says
I feel like every other time I come to your site it's SRC time. Lol. I guess time is just flying by this summer because I know that's not true! LOVE me some cheesecake, but add some cherry pie filling to that and OMG, HEAVEN! This looks delicious, girlfriend! Cheers!
Anu - My Ginger Garlic Kithcen says
Who doesn't love a good cheesecake bar? Love the idea od cherry filling. Yellow ones are new to me, I have never had yellow cherries before! Will try to look for them!
Jane, The Heritage Cook says
What a delightful choice for the SRC reveal. I love cheesecake but hate worry about the water bath leaking into my springform pan. The use of a 9x13 pan for this version is brilliant and I can't wait to give it a try. I love that you used different types of cherries to get the dual-colored toppings. So fun!
Anca says
The cheesecake looks amazing.
I'm going to join the Secret Recipe Club. I had to make some adjustments to my blog and now I'm ready to apply. x
Our Eating Habits says
They look delicious! I love that yo made the cherry pie filling homemade, and with two colours! It is so pretty!!
Heather @ Join Us, Pull up a Chair says
MMM....I love cheesecake bars like these but don't make them often. Your cherry filling looks amazing too!
Rafeeda@The Big Sweet Tooth says
I am so tempted! This look so good... feel like grabbing a couple of pcs...